Tier ဆုိတာ ကုိယ္ ေရးသားေတာ႔မယ္႔ Web Application တစ္ခုကုိ ပံုစံတက် တည္ေဆာက္ျခင္း ျဖစ္ပါတယ္ ။ Web Application တစ္ခုကုိ Develop လုပ္ျပီ ဆုိရင္ Web Application ရဲ႔ သေဘာတရားအရ Database ( MS SQL Server / Oracle / MySQL ) တစ္ခုခု နဲ႔ေတာ႔ ခ်ိတ္ဆက္ရေတာ႔မွာ ျဖစ္ပါတယ္ ။ အဲဒီလုိ ခ်ိတ္ဆက္ ရတဲ႔ အေျခအေနေတြေပၚ မူတည္ျပီး Tier ဆုိတဲ႔ စကားလံုး စတင္ထြက္ေပၚလာတာ ျဖစ္ပါတယ္ ။ Tier ဆုိတဲ႔ စကားလံုးရဲ႔ ဆုိလုိရင္းကုိ ေအာက္မွာ ဆက္ေလ႔လာရင္း သေဘာေပါက္သြားမွာပါ ။
One Tier ဆုိတာ One Tier ကုိ မေျပာခင္ သတိထားရမယ္႔ အခ်က္တစ္ခ်က္ကုိ အရင္ေျပာျပ လုိပါတယ္ ။ အဲဒါကေတာ႔ Visual Studio ကုိ ဖြင္႔ လုိက္ျပီ ဆုိတာနဲ႔ File ေအာက္က New ရဲ႔ အထဲမွာ Project / Web Site စတဲ႔ နွစ္မ်ိဳးကုိ စတင္ေတြ႔ရမွာ ျဖစ္ပါတယ္ ။ One Tier Web Application ေတြကုိ Develop လုပ္ၾကရာမွာ File ေအာက္က New ထဲမွာ ရွိတဲ႔ Web Site ကုိသာ ရယူ အသံုးျပဳၾကတာ မ်ား ပါတယ္ ။ ဒါကေတာ႔ One Tier ရဲ႔ သေဘာတရားပါ ။
One Tier ရဲ႔ အားသာခ်က္ ။ ။ အဲဒီ အခ်က္ကေတာ႔ အလ်င္အျမန္ ေရးသားနုိင္ျခင္းမ်ိဳး ( Quickly Development ) ပဲ ျဖစ္ပါတယ္ ။ Project ရဲ႔ DLL File ကုိ Web Site ကေန Reference ယူစရာ မလိုတဲ႔ အခ်က္ဟာ One Tier ကုိ အလ်င္အျမန္ Develop လုပ္နုိင္တဲ႔ ေကာင္းမြန္ေသာ အခ်က္ တစ္ခု ျဖစ္လာေစပါတယ္ ။
One Tier သည္ Small and Medium Application မ်ားကုိ Develop လုပ္ရန္ အတြက္ အထူးသင္႔ေတာ္ပါသည္ ။ ဒီ ေနရာမွာ အျဖစ္အပ်က္ေလးတစ္ခုကို ထည္႔သြင္း ေဖၚျပေပးခ်င္ပါတယ္ ။ က်ြန္ေတာ္႔ သူငယ္ခ်င္းတစ္ေယာက္ Singapore မွာ အလုပ္သြားေလွ်ာက္ပါတယ္ ။ အဲဒီမွာ အခ်ိန္နဲ႔ တေျပးညီ Develop လုပ္ျပရမယ္႔ Practical တစ္ခု ပါ၀င္လာပါတယ္ ။ သာမန္ Web Application သေဘာတရားတစ္ခုကိုသာ ျပဳလုပ္ခုိင္းတာျဖစ္ျပီး DB ကုိ Select , Insert , Update , Delete စတာေလာက္သာ လုပ္ခိုင္းတာျဖစ္ပါတယ္ ။ DB ပုိင္းကုိ ပုိင္နုိင္စြာ လုပ္ျပနုိင္ေပမယ္႔ Web Application ကုိ Develop လုပ္ရာမွာ Multi tier ပံုစံကုိ ေရြးခ်ယ္လုိက္တဲ႔ အတြက္ အခ်ိန္မေလာက္ျဖစ္ျပိး အဲဒီ Interview မွာ သူ Fail ျဖစ္ခဲ႔ပါတယ္ ။ ကုိယ္ လုပ္ရမယ္႔ အလုပ္တစ္ခုကို Decision ခ်ရာမွာ မွားယြင္းခဲ႔တဲ႔ အတြက္ တခါတရံမွာ မလုိအပ္တဲ႔ နစ္နာဆံုးရွံုးမွုေတြ ၾကံဳရတတ္ပါတယ္ ။ တကယ္ဆုိ သူ႔ Skill သူ႔ Level နဲ႔ဆုိရင္ အလြယ္တကူ အဆင္ေျပနုိင္တဲ႔ အေနအထား ေလာက္သာ ျဖစ္ပါတယ္ ။ ဒါေၾကာင္႔ Small and Medium Application တစ္ခုကုိ Develop လုပ္မယ္ဆုိရင္ One Tier သာ အေကာင္းဆံုးပါ ။ One Tier ရဲ႔ အားနည္းခ်က္ ။ ။ အားနည္းခ်က္ကေတာ႔ Large Application မ်ားကုိ Develop လုပ္ရာမွာ ေနွာင္႔ေနွး ေစေသာ အခ်က္ျဖစ္ပါတယ္ ။ Web Site တစ္ခုထဲ အတြင္းမွာ Programmer မ်ားစြာ စုေပါင္း Develop လုပ္ရတာျဖစ္တဲ႔ အတြက္ Web Site ကုိ Build လုပ္ရာမွာ အခက္အခဲေတြ အမ်ားၾကီးကုိ ျဖစ္ေပၚေစပါတယ္ ။ တစ္ေယာက္ Develop လုပ္ျပီးတာ တစ္ေယာက္က ေစာင္႔ေနရတဲ႔ အတြက္ Time & Costs ဟာ အမ်ားၾကီး ျဖစ္သြား တတ္ပါတယ္ ။ ဒါေၾကာင္႔ One Tier သည္ Large Application မ်ားကုိ Develop လုပ္ရန္ မသင္႔ေတာ္ေသာ အရာတစ္ခု အျဖစ္ သိမွတ္နားလည္ ထားသင္႔ပါတယ္ ။
Tier ကုိ ဘယ္ေလာက္မ်ားမ်ား ခြဲတတ္ပါသလဲ ဆိုတာကေတာ့ ကုိယ္အလုပ္လုပ္မယ္႔ Company အေနအထားေပၚမွာသာ မူတည္ပါတယ္ ။ မိမိ အလုပ္လုပ္တဲ႔ Company က သတ္မွတ္ေပးထားတဲ႔ Tier အတုိင္းသာ Web Developer က Develop လုပ္ေရးသားရမွာ ျဖစ္တဲ႔ အတြက္ Tier ခြဲျခင္းဟာ Company ေပၚမွာ သာ မူတည္မွာပါ ။
Web Application တစ္ခုကို Tier ခြဲ ေရးသားျပီဆုိရင္ သမရိုးက် အသံုးျပဳေနက် Web Site သာမက Project ေတြပါ ပါ၀င္လာမွာ ျဖစ္ပါတယ္ ။
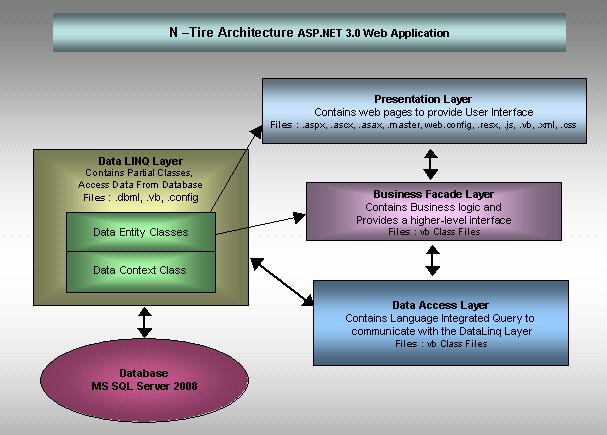
Web Application တစ္ခု Develop လုပ္ဖုိ႔ အတြက္ Web Site တစ္ခု နွင္႔ Project နွစ္ခု ေပါင္းစပ္ အလုပ္လုပ္ပံုကုိ ေဖၚျပေပးထားပါတယ္ ။ Tier ခြဲလုိက္ျခင္းအားျဖင္႔ ပုိမုိ ရွင္းလင္းတိက်တဲ႔ ပံုစံနဲ႔ Web Application တစ္ခုကို Develop လုပ္နုိင္မွာ ျဖစ္ပါတယ္ ။
Tier ေတြ ကုိ သတ္မွတ္ရာမွာ ေယဘုယ် သတ္မွတ္ခ်က္မ်ား အေနနဲ႔ေတာ႔ Web Site ပုိင္းကုိ UI ( User Interface ) ၊ တြက္ခ်က္မွုေတြ ျပဳလုပ္မယ္႔ Project အပုိင္းကုိ BL ( Business Logic ) ၊ Database ရဲ႔ Stored Procedure လုိ အရာမ်ိဳးေတြနဲ႔ တုိက္ရုိက္ထိေတြ႔ ဆက္သြယ္မွု အပုိင္းကုိ DA ( Data Access ) စသည္ျဖင္႔ ေခၚယူ သတ္မွတ္ေလ႔ ရွိပါတယ္ ။
Web Developer ေလာကမွာ ( One Tier ျဖစ္ေစ ၊ Multi Tier ျဖစ္ေစ ) ဘယ္လုိပံုစံမ်ိဳး မဆုိ Develop လုပ္တတ္ရမွာျဖစ္ျပီး အလ်ဥ္းသင္႔ရင္ သင္႔သလုိ အလုပ္လုပ္နုိင္ဖုိ႔ အတြက္ နွစ္မ်ိဳးလံုး တတ္က်ြမ္းထားဖုိ႔ လုိအပ္မွာပါ ။ One Tier Develop လုပ္ပံုနွင္႔ Multi Tier အလုပ္လုပ္ပံုဟာ ကြာျခားတဲ႔ အတြက္ ေသခ်ာ စနစ္တက် ေလ႔လာထားပါမွ မည္သည္႔ Web Application ကုိ မဆုိ ပံုစံ မ်ိဳးစံ Tier မ်ိဳးစံု နဲ႔ Develop လုပ္နုိင္မွာပါ ။Converting ASP.Net Multi-tier Applications to Applications with a Silverlight Client


This article describes how can convert an ASP.Net multi-tier business application to business application with Silverlight client.
There are a lot of business n-tier applications, developed like ASP.Net applications.
Sometimes it is an advantage if it is possible quickly and easily to convert the client side of these applications from ASP.Net to Silverlight. Silverlight proposes rich environment for development and it is very similar to WPF framework. Often Silverlight applications could be created quicker than most of ASP.Net based applications and easily ported to applications with WPF based desktop clients.
Demo application presents simple multi-tier ASP.Net application with four business object classes : ContactPerson, Address, EmailAddress and PhoneNumber. We will add a Silverlight client application with WCF RIA Services link. Then we will add Domain Service Class and add a business logic there using the existing classes with business logic and business objects. Finally we will add UI components , related with the Domain Context from our Domain Service Class.
Components of the ASP.Net n-tier applications:
Generally, ASP.Net application has four components:

- Business Objects (BO)
First, there are a number of business objects that live in the ASPNTierApp.BO namespace ASP.Net application, indicated by the rectangle on the right. The classes used for these objects in this sample are the ContactPerson, the Address, the EmailAddress and the PhoneNumber. They don't have any behavior, and can therefore be considered as "dumb" objects. All they can do, is hold and expose data through their public properties. Additionally, there is a generic list for each BO object like ContactPersonList, EmailAddressList and so on.
Each of the other three components of the application has a reference to the objects in the Business Objects layer. This means that the web site can consume objects like ContactPerson that are returned from the business layer that in turn got them from the data access layer.
- Business Logic Layer (Bll)
In the middle of the diagram, you see the Business Logic Layer; the bridge between the web site and the data access layer. The Bll gets instructions from the presentation layer (the web site in this example), to carry out tasks, like retrieving items from the data layer, or sending changed objects back into this layer. Additionally, it can perform tasks like enforcing security and carrying out validation, as you saw in part two of this article series.
- Data Access Layer (Dal)
The data access layer contains the code that directly interacts with the data source, a SQL Server database in the case of the Contact Person Manager application but this could be any other kind of data source, like text or XML files, different databases and any other data source you can come up with.
- Presentation Layer
At the top of the diagram, you see the Web Site, the presentation layer of this application. It's the web site and the pages and code it contains that is the main subject of this article, as you have already seen the other three parts in the previous two articles.
Many people asked how can migrate the Presentation Layer in their multi-tier applications from ASP.Net to Silverlight, without changing the business logic and structure of the used business objects.
One possible way is to use a Silverlight client application with the WCF RIA Services link.

It is possible to realize the application with the Silverlight WCF Services or other kind of WEB Services, but with a WCF RIA Services we could write the business logic only one way for both: client and server side.
Demo Application:
In this article we will create a demo ASP.Net application that includes these layers.
After that we will add a Silverlight application with the WCF RIA Services link.
Requirements:
Visual Studio 2010
Silverlight Tools for Visual Studio 2010
Silverlight 4 Toolkit (April) - optional
You need also an installed SQL Server Express or higher license.
Steps to create a sample ASP.Net multi-tired application:
- Create an ASP.Net Application
- Create a sample Demo ASP.Net application project:
- Create an ASP.Net WEB Application
- Create objects from Data Access Layer
- Create Business Objects
- Create class definitions from Business Logic Layer (BLL)

Data Access Layer
Application uses a sample database, named "Migration". You could download a backup of that database here.
Connection string is saved in the Web.Config file. There is a simple class AppConfiguration, that returns a connection string.
public class AppConfiguration
{
/// <summary>
/// Returns the connectionstring for the application.
/// </summary>
public static string ConnectionString
{
get
{
return ConfigurationManager.ConnectionStrings["Migration"].ConnectionString;
}
}
}
<connectionStrings>
<add name="Migration" connectionString="Data Source=(local)SQLEXPRESS;Initial Catalog=SilverligtMigration;Integrated Security=True" providerName="System.Data.SqlClient"/>
</connectionStrings>
There are four classes, providing data manipulation with database:
ContactPersonDao, AddressDao, EmailAddressDao and PhoneNumberDao
For each of these classes there are methods to select, edit, delete and update data from the database:
For example in the ContactPersonDao class method GetList returns a list with all items from ContactPerson table. Method Save provides Insert/Update manipulation.
These methods calls stored procedures from database.
/// <summary>
/// Returns a list with ContactPerson objects.
/// </summary>
/// <returns>A generics List with the ContactPerson objects.</returns>
public static ContactPersonList GetList()
{
ContactPersonList tempList = null;
using (SqlConnection myConnection = new SqlConnection(AppConfiguration.ConnectionString))
{
SqlCommand myCommand = new SqlCommand("sprocContactPersonSelectList", myConnection);
myCommand.CommandType = CommandType.StoredProcedure;
myConnection.Open();
using (SqlDataReader myReader = myCommand.ExecuteReader())
{
if (myReader.HasRows)
{
tempList = new ContactPersonList();
while (myReader.Read())
{
tempList.Add(FillDataRecord(myReader));
}
}
myReader.Close();
}
}
return tempList;
}
/// <summary>
/// Saves a contact person in the database.
/// </summary>
/// <param name="myContactPerson">The ContactPerson instance to save.</param>
/// <returns>The new ID if the ContactPerson is new in the database or the existing ID when an item was updated.</returns>
public static int Save(ContactPerson myContactPerson)
{
int result = 0;
using (SqlConnection myConnection = new SqlConnection(AppConfiguration.ConnectionString))
{
SqlCommand myCommand = new SqlCommand("sprocContactPersonInsertUpdateSingleItem", myConnection);
myCommand.CommandType = CommandType.StoredProcedure;
if (myContactPerson.Id == -1)
{
myCommand.Parameters.AddWithValue("@id", DBNull.Value);
}
else
{
myCommand.Parameters.AddWithValue("@id", myContactPerson.Id);
}
myCommand.Parameters.AddWithValue("@firstName", myContactPerson.FirstName);
myCommand.Parameters.AddWithValue("@lastName", myContactPerson.LastName);
if (String.IsNullOrEmpty(myContactPerson.MiddleName))
{
myCommand.Parameters.AddWithValue("@middleName", DBNull.Value);
}
else
{
myCommand.Parameters.AddWithValue("@middleName", myContactPerson.MiddleName);
}
myCommand.Parameters.AddWithValue("@dateOfBirth", myContactPerson.DateOfBirth);
myCommand.Parameters.AddWithValue("@contactpersonType", myContactPerson.Type);
DbParameter returnValue;
returnValue = myCommand.CreateParameter();
returnValue.Direction = ParameterDirection.ReturnValue;
myCommand.Parameters.Add(returnValue);
myConnection.Open();
myCommand.ExecuteNonQuery();
result = Convert.ToInt32(returnValue.Value);
myConnection.Close();
}
return result;
}
Business objects:
There are four business objects, representing data (tables) in the database:
ContactPerson, Address, EmailAddress and PhoneNumber.
They don't have any behavior, and can therefore be considered as "dumb" objects. All they can do is hold and expose data through their public properties
public class Address
{
#region Members
private int _id = -1;
private string _street = String.Empty;
private string _houseNumber = String.Empty;
private string _zipCode = String.Empty;
private string _city = String.Empty;
private string _country = String.Empty;
private ContactType _type = ContactType.NotSet;
private int _contactPersonId = -1;
2...http://www.codeproject.com/ Labels: ASP.NET
Ref:1..ျပည္႔ျဖိဳးေမာင္ေမာင္( Asp.Net Web Developer )stringlive@gmail.com


KKZ Myanmar Unicode Keyboard


MoneTineKeyboard

Like လုပ်ထားနိုင်ပါတယ်

Labels
ဧည့်သည်တော်များခင်ဗျာ
- အခုဖတ်မည့် Post သည် လိင်မှု ပိုင်းဆိုင် ရာများ ကိုရေးသားထားခြင်းဖြစ်ပါသည်......
- သို့သော်ကျွန်တော်တို့ ရေးသား တင်ပြထားရခြင်းသည် ကျန်းမာရေး အတွက် သိထားနားလည် ထားသင့်သည် ဟုယူဆသော်ကြောင့်ဖြစ်ပါသည်.......
- ကျွန်တော်တို့၏ ဆောင်ပုဒ်သည်"ဘယ်အရာမဆို အားလုံးကို လုံးဝမတတ်ရင်နေ သိထား နားလည် ထားနိုင်ရင် ပိုကောင်းတယ်.." ဟု ဖြစ်ပါသည်..

